tldr; You can effectively schedule your jekyll posts on Github Pages via a GitHub Action to build your site at a regular scheduled time and future date your posts. [Skip to Steps]
First Scheduled Post
If all goes well, the post you are reading now will be my first post whose publication was facilitated by a github action. Specially today at 1:50 PM UTC 😀.
Motivation
In the beginning, webpages were very basic and static. It was pretty much HTML and text content. Overtime, web pages became more dynamic, requiring backend systems to update content on the page. Web source files became very bloated, large in size and hard to read. Unfortunately, this is still often the case today; however, there is a push to go back to a world where webpage source code is much simpler focusing more on content and less on functionality. This is where Jamstack comes in.
Javascript APIs Markup Stack
Nothing more … nothing else.
No owned backend services. Just a webserver to host your HTML files.
I use Jekyll to build this blog. Jekyll is a popular tool in the Jamstack space that allows you to focus on the content of your site while it handles all the details of generating all of the web page source code.
This paradigm is great; however, you loose functionality that is often available when your site and blogging framework has a back end; such as scheduling posts. This is something I thought about often and devised intricate plans of scheduling wake up times for my personal machine so that cron jobs could run to issue API requests triggering builds of my site [a]. With GitHub actions, these kinds of tasks are much simpler. A GitHub action workflow file can be configured to perform a series of tasks relating to your respository on a server. This is very powerful; it’s like having your own personal virtual machine (VM) on demand. The rest of this post will be on how I configured a GitHub Action to effectively schedule this post.
Steps
Assumptions: The following steps are for a username.github.io repo. Likely the steps will be similar for a project or organization site.
-
Tell Jekyll Not to Publish Posts Dated in the Future
This option is really what makes this setup work. We can accomplish this by updating thefuturevalue to false in the_config.ymlfile in the root of your repository.future: false -
Create a GitHub Token
The GitHub action will need a token in order to authenticate and execute actions on your repository.-
Navigate to Your GitHub Profile Settings
Profile Icon -> Settings -> Developer Settings -> Personal access tokens -> New personal access token -
Provide a Name, Expiration and Access Scopes & Generate Token
The fullrepoaccess should suffice (Includes access to both public & private repositories). The GitHub action will need to read and write to the repository. -
Copy The Access Token For Later Use
-
-
Add GitHub Token As a Secret to Your Repository
The GitHub Action will access your token through this secret value.-
Navigate to Your Repository Setting
Settings -> Secrets -> New repository secretGive it a name (i.e.
GH_ACTIONS_TOKEN) and enter in the token value created in the previous step above and click add “Add Secret”.
-
-
Create the GitHub Actions Workflow File
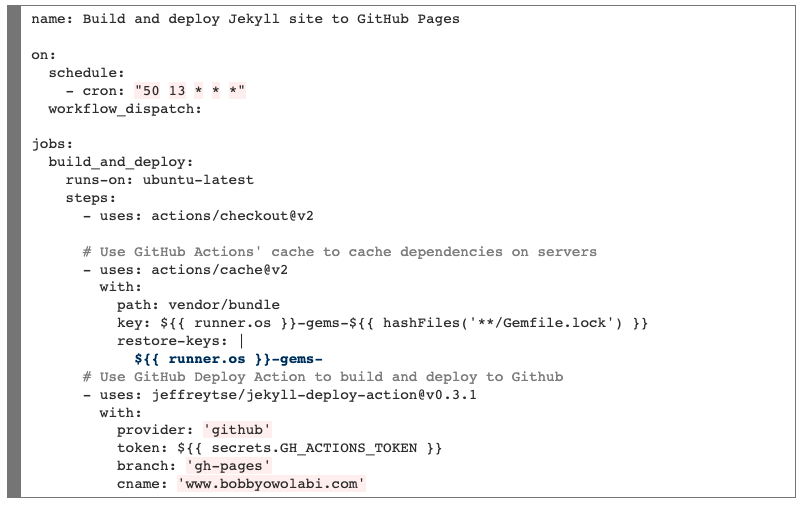
Create a new file in your repository (i.e.jekyll.yml), in the directory.github/workflows -
Configure the
jeffreytse/jekyll-deploy-actionGitHub Action to Build & Deploy Your Site [b]File:
.github/workflows/jekyll.yml:Some Configuration Notes:
- Figure out how often you would like the site to build using crontab.guru. Put this value in the cron value above.
- The
workflow_dispatchvalue is optional. It provides you with the ability to run your workflow on demand by providing an icon in the Actions tab of your repository. This is helpful for troubleshooting versus trying to update the cron schedule value. - If you do not use a custom domain, the cname property is not necessary.
- The actions/cache action is also optional, but should speed up deploy time by caching the site dependencies.
-
Update Repository’s
PagesSettings-
Navigate to Pages Settings
Settings -> Pages -
Under Source, Select Branch to Build From
Make sure that the branch you select matches thebranchproperty from the workflow file above.gh-pagesbranch seems to be an accepted convention. -
Update Github Custom Domain Property
If you have a custom domain, make sure to update theCustom domainproperty with the value. Otherwise, you can skip this.
-
-
Test Out Your Action
If you haveworkflow_dispatchspecified in workflow configuration, you can run the workflow on-demand by clickingRun workflowon the workflow under the Actions tab.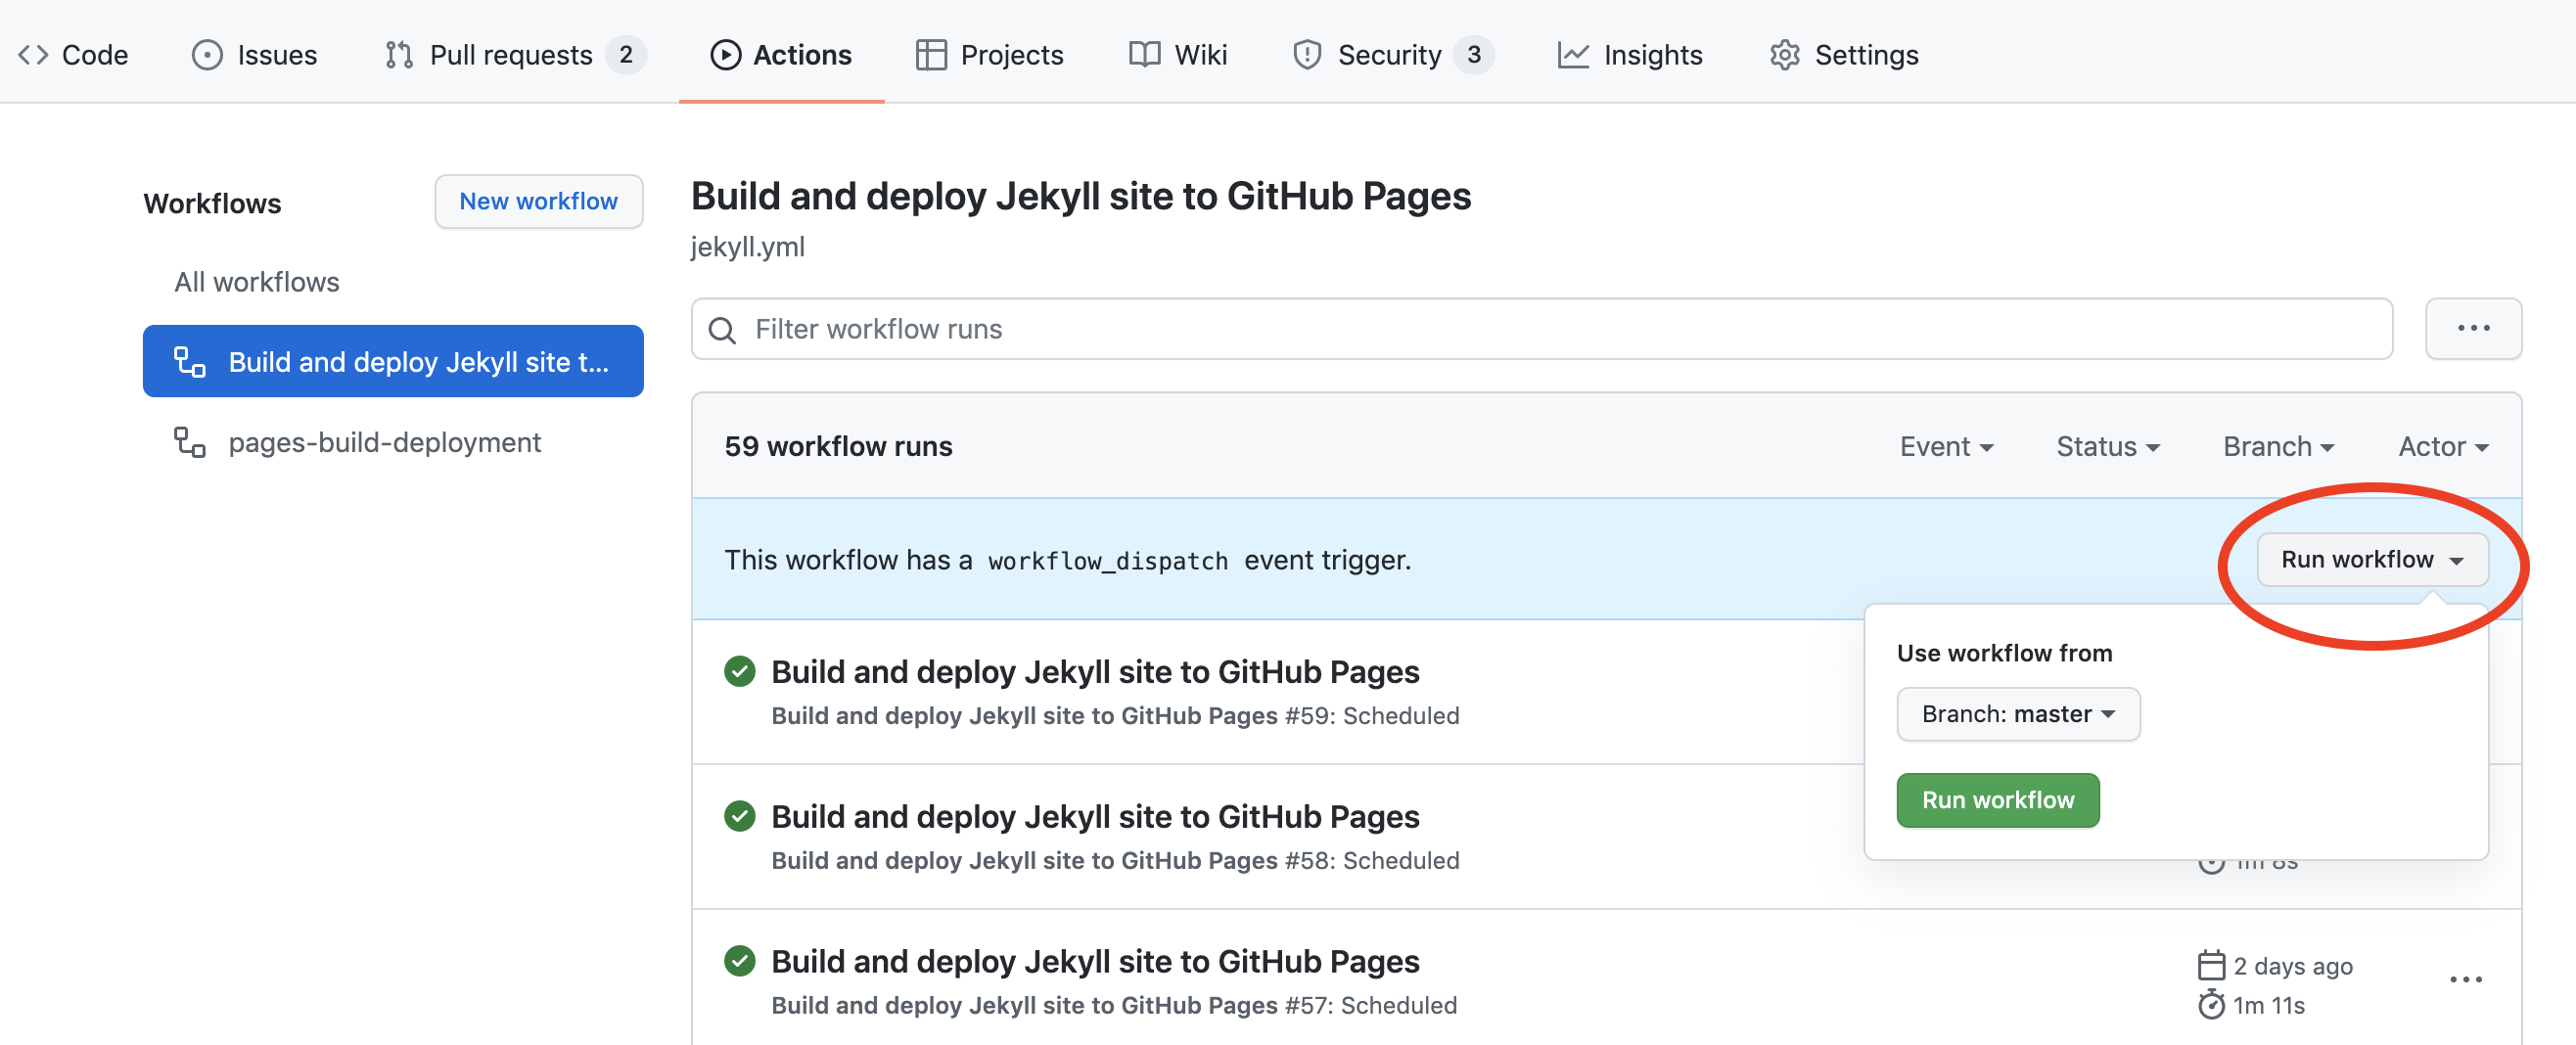
-
Future Date Your Next Post
- Set the date of your next post to a future date
- Forget about it!
- Move on to the next one!
Notes
[a] Some resources that I have come across over the years:
[b] Initially I started using the helaili/jekyll-action. This seems to be the Action specified in official documentation. It worked when I used it; however, it does not support custom domains by creating the CNAME file. I tried to manually create the CNAME file in the yaml workflow definition itself but was unable to. The jeffreytse/jekyll-deploy-action Action supports custom domains.